
New countertops cost thousands. A full cabinet repaint runs nearly as much. But the thing most people notice first when they walk into a dated kitchen is the hardware — those tarnished brass pulls from 1994 that catch the light on every single door and drawer. Swapping them out takes an afternoon and a fraction of the budget, yet the visual difference is dramatic.
Short answer: Cabinet hardware replacement is one of the best dollar-for-dollar kitchen upgrades available. A set of quality pulls and knobs, installed consistently and at the right proportions, can make a 20-year-old kitchen feel current without touching a single cabinet box.
Why Hardware Makes Such a Big Impact
Cabinet hardware sits at eye level and you interact with it every time you open a door or drawer. That constant visibility is exactly why tired hardware — think yellowed plastic, pitted chrome, or tarnished brass — telegraphs age so loudly. Conversely, crisp new hardware in a cohesive finish reads as a deliberate design choice, not an afterthought.
There is also a functional argument. Worn or poorly fitted hardware is genuinely harder to use. Loose knobs spin under your fingers. Pulls that are too small force you to grab awkwardly. Modern bar pulls in the 3-to-5-inch range give you a firm, comfortable grip, which matters when your hands are full or slightly damp from cooking.
Choosing the Right Style: Pulls vs. Knobs
The most practical layout for most kitchens combines two hardware types: bar pulls on drawers and larger doors, knobs on upper cabinet doors. Here is the logic behind that choice.
Bar Pulls
A bar pull — sometimes called a cup pull or cabinet pull — uses two screws set a fixed distance apart, called the center-to-center (CC) measurement. Common CC sizes are 3", 3-3/4", 4", and 5". The elongated grip distributes the opening force across your whole hand, which is especially useful on heavy drawer fronts or wide pantry doors.
General sizing guideline: aim for a pull length roughly one-third the width of the drawer front. A 12-inch drawer looks proportional with a 3-to-4-inch pull. A 24-inch drawer can carry a 5-to-6-inch pull comfortably.
Knobs
Knobs use a single screw, which makes installation straightforward — no measuring between two holes. They are traditionally used on upper cabinet doors where the opening force is lighter. Standard knob diameter ranges from 1 to 1-1/2 inches. Go smaller on shaker-style or inset doors; slightly larger works on flat-front euro-style cabinets.
Mixing Styles
Many kitchens use pulls on all drawers and all lower doors, knobs on upper doors only. Some designers go all-pulls throughout for a cleaner, more contemporary look. All-knobs is less common today but still appropriate in a traditional or cottage-style kitchen. What you want to avoid is a random mix with no logic — it reads as unfinished.
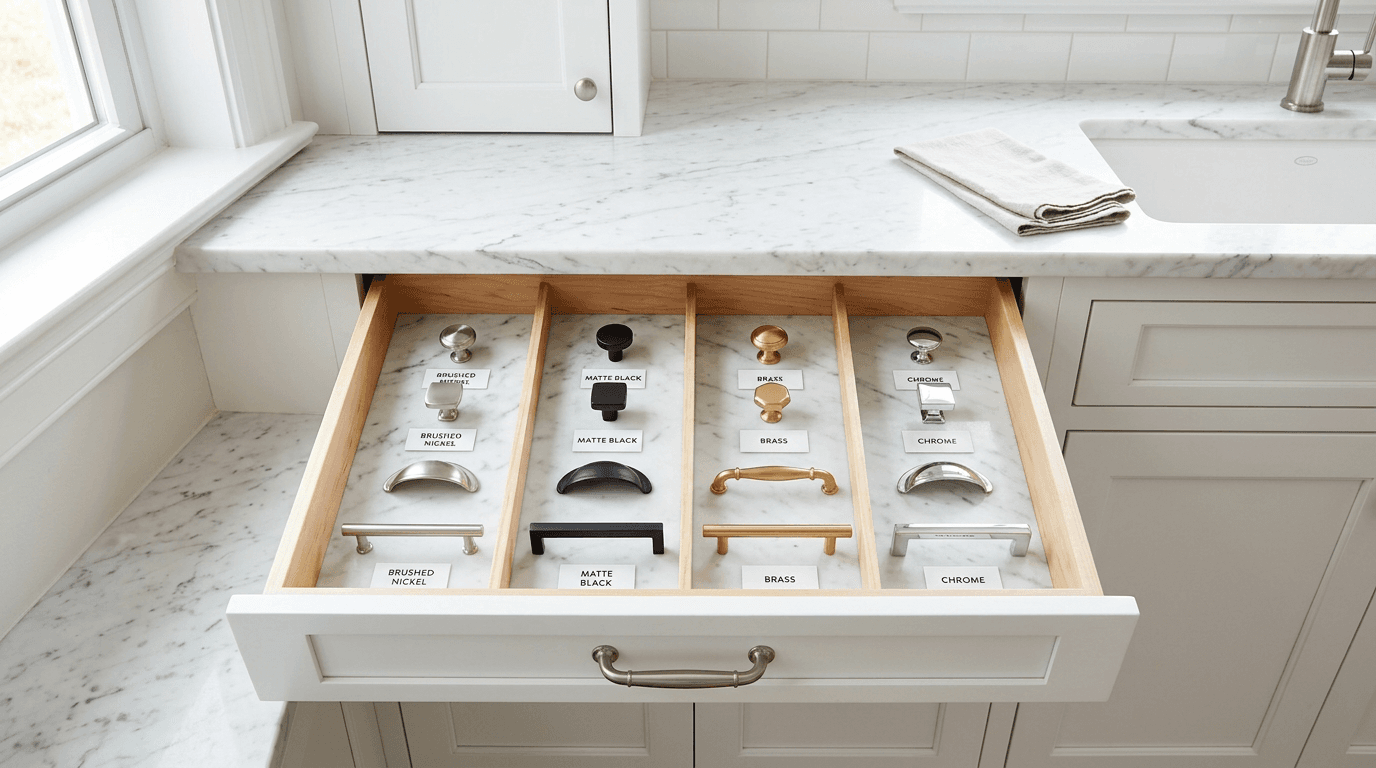
Selecting a Finish: A Practical Comparison
| Finish | Look | Pairs Well With | Practical Notes |
|---|---|---|---|
| Matte black | Bold, modern, graphic | White or gray cabinets, black appliances | Shows fingerprints less than polished finishes; highly durable powder coat |
| Brushed/satin nickel | Neutral, versatile | Nearly any cabinet color; stainless appliances | The most forgiving match; hides water spots well |
| Brushed gold / champagne bronze | Warm, on-trend | White, navy, sage cabinets; warm wood tones | Works best in kitchens with warm-toned counters or floors |
| Oil-rubbed bronze | Traditional, earthy | Raised-panel doors, cherry or walnut cabinets | Can read dated in very contemporary spaces |
| Polished chrome | Crisp, bright | Modern flat-front cabinets | Shows fingerprints readily; timeless but high-maintenance |
| Polished brass | Classic, bold | Traditional or eclectic kitchens | Unlacquered versions develop patina over time |
The most important rule: your hardware finish should coordinate with the other metals already in the kitchen. Your faucet, light fixtures, and appliance handles are the anchors. You do not have to match exactly — intentional mixed metals (for example, matte black hardware with brushed brass lighting) are widely used and can look deliberate and refined. What you want to avoid is an accidental clash, such as polished chrome hardware next to oil-rubbed bronze faucets with no design rationale.
The Hole-Spacing Problem — and How We Handle It
This is where many DIY hardware swaps go sideways. There are really only three scenarios:
1. Knob-for-knob: One hole, one screw. As long as the new knob's post diameter is standard (which it almost always is), this is plug-and-play.
2. Pull-for-pull, same center-to-center: Measure your existing CC and buy new pulls at the same measurement. This is also straightforward.
3. Changing from knobs to pulls, or changing the CC measurement: This requires drilling new holes. The old holes need to be filled and finished before or after drilling. On painted cabinets, a careful fill-and-touch-up is usually invisible. On stained wood cabinets it is more involved — this is where professional help pays off.
If you are changing hole configurations, a cabinet refinishing job may make sense at the same time, since the cabinet faces are already being worked on.
We use installation templates — strips or jigs that set the exact position for every pull on every door — so every piece of hardware ends up at the same height and position. On a 20-cabinet kitchen, that consistency is what separates a polished result from one that looks slightly off.
Sizing Reference at a Glance
| Cabinet / Drawer Type | Recommended Pull Length | Knob Size |
|---|---|---|
| Small drawer (under 12") | 3" CC pull | 1" to 1-1/4" knob |
| Standard drawer (12"–18") | 3-3/4" to 4" CC pull | 1-1/4" knob |
| Large drawer (18"–24") | 4" to 5" CC pull | Not typical |
| Upper door (standard) | 3" to 4" CC pull or knob | 1" to 1-1/2" knob |
| Lower door (wide) | 4" to 5" CC pull | Knob less common |
| Pantry / tall door | 5" to 6"+ CC pull | Knob not recommended |
What the Installation Actually Involves
A professional hardware installation visit covers:
- Confirming the hardware selection and CC measurements before drilling anything
- Laying out the position template for consistent placement across all doors and drawers
- Drilling any new holes cleanly, without blowout on the face side
- Filling old holes if the configuration changed
- Securing every piece with the correct screw length (too short = pull works loose over time; too long = screw protrudes inside the cabinet)
- A final pass to make sure nothing spins, rattles, or sits crooked
For a typical kitchen of 25–35 pieces of hardware, this usually takes two to three hours. For a Rockland County free estimate, see below.
Typical 2026 Pricing in Rockland County
| Scope | Typical Range |
|---|---|
| Hardware-only (knob-for-knob, no drilling) per piece | $4–$8 labor |
| Pull-for-pull, same CC (no drilling) per piece | $5–$9 labor |
| New drilling required per hole | $8–$15 per hole |
| Old hole fill-and-touch (painted cabinets) per hole | $10–$20 per hole |
| Full kitchen (20–35 pieces, no re-drilling) | $150–$350 labor |
These are general estimates for 2026 Rockland County labor rates, not a quote for your project. For accurate pricing, see our [Rockland County handyman pricing guide](/blog/rockland-county-handyman-pricing-2026) or [request a free estimate](/estimate).
Hardware itself ranges widely — big-box store basics run $2–$5 per piece; mid-range brushed nickel or matte black from brands like Liberty, Amerock, or Top Knobs runs $5–$15 per piece; designer hardware from Rejuvenation or Restoration Hardware can exceed $25–$50 per piece. We install customer-supplied hardware or can source it for you.
Frequently Asked Questions
How long does cabinet hardware replacement take in a typical kitchen?
For a kitchen with 25–35 cabinet doors and drawers, and no re-drilling required, a professional installation typically takes two to three hours. If new holes need to be drilled and old ones filled, add roughly 30–60 minutes depending on scope.
Do I need to replace all hardware at once, or can I do it in phases?
Technically you can phase it, but visually a half-updated kitchen often looks worse than the original. If budget is the concern, we recommend doing all hardware in one pass — the hardware itself is a relatively small cost compared to labor.
What if my existing holes do not line up with the pulls I want?
If the center-to-center measurement differs, new holes need to be drilled and old holes filled. On painted cabinets this is a clean repair. On stained or natural wood, filling holes invisibly is harder — a consultation helps set expectations before you order hardware.
Is matte black hardware hard to keep clean in a kitchen?
Matte black powder-coat finishes are actually quite forgiving — they do not show water spots or fingerprints the way polished finishes do. A quick wipe with a damp cloth is usually sufficient. Avoid abrasive cleaners that can scratch the finish over time.
Can a handyman do this, or do I need a cabinet contractor?
Hardware installation is solidly within handyman scope. We handle this regularly throughout Rockland County — in New City, Nyack, Nanuet, Pearl River, and across the county. No specialized contractor license is required for hardware replacement.
Does new hardware add resale value?
It adds perceived value, which is what matters at showing time. Real estate agents consistently list updated hardware as a low-cost, high-return pre-listing improvement. Combined with a fresh coat of paint and touch-up repairs, hardware replacement is part of a smart pre-sale prep strategy.
Ready to Update Your Kitchen Hardware?
If you are in Rockland County — whether you are in Suffern, Haverstraw, Nanuet, Pearl River, or anywhere in between — we can handle your hardware installation from start to finish. Call or text (908) 461-2688, or request a free estimate online. We will confirm your measurements, coordinate on finish and style if needed, and get it done in a single visit.
Odds & Ends Handyman Service is a licensed Rockland County Home Improvement Contractor (#H-25-600), insured for $1,000,000, serving Rockland County, NY since 2001.